Related: See Preservation for Raspberry Jalapeno jam and Raspberry Orange dessert sauce (great on cheesecakes!).
Living in the Pacific Northwest (PNW), I am very lucky that berries are "easy" to grow. In fact, certain non-native berries like blackberries are considered a weed and are highly invasive. In my back yard, I have a long fence that separates the neighbors behind me and my yard. They are the nicest couple and very tolerant of all of my crazy berry plants!
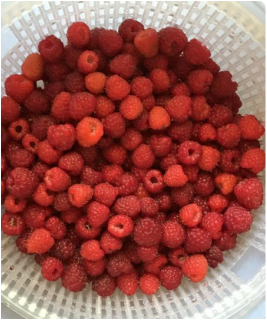
Raspberries are fairly easy to grow and if you get the "thornless" (they still have them but very small), you can avoid many of the hassles usually associated with berries. There are very few pests that can kill the plants except cane worms...those can be a problem. However, I definitely operate under the theory that if you plant enough bushes, you will get enough berries! Raspberries are an early summer harvest. With the heat wave we have had this year, it is not surprising that I have already harvested my first big set of raspberries. Blackberries are much later in the summer. [Side note: I do not plant blackberries due to the massive thorns and their very aggressive, non-native, invasive status! However, I also can't kill them or make them go away, so I at least try to get the berries out of them.]
Raspberries are tricky to harvest only because the shade of color means a lot and you have to battle the canes and thorns. You also have to pick them one at a time and delicately place them in the harvest bag. Color is everything for raspberries. Squishiness (very technical term) is a secondary factor but you can usually spot the purple, squishy ones that are over-ripe and no good. The ideal color for your regular red raspberry is ruby to garnet color. You don't want fire-engine red with super hard little berries, you want the deep vibrant rich red. However you also do not want purple, squishy berries. As soon as they are harvested, I rinse them in a salad spinner and began to sort based on what I will be using them for.
Living in the Pacific Northwest (PNW), I am very lucky that berries are "easy" to grow. In fact, certain non-native berries like blackberries are considered a weed and are highly invasive. In my back yard, I have a long fence that separates the neighbors behind me and my yard. They are the nicest couple and very tolerant of all of my crazy berry plants!
Raspberries are fairly easy to grow and if you get the "thornless" (they still have them but very small), you can avoid many of the hassles usually associated with berries. There are very few pests that can kill the plants except cane worms...those can be a problem. However, I definitely operate under the theory that if you plant enough bushes, you will get enough berries! Raspberries are an early summer harvest. With the heat wave we have had this year, it is not surprising that I have already harvested my first big set of raspberries. Blackberries are much later in the summer. [Side note: I do not plant blackberries due to the massive thorns and their very aggressive, non-native, invasive status! However, I also can't kill them or make them go away, so I at least try to get the berries out of them.]
Raspberries are tricky to harvest only because the shade of color means a lot and you have to battle the canes and thorns. You also have to pick them one at a time and delicately place them in the harvest bag. Color is everything for raspberries. Squishiness (very technical term) is a secondary factor but you can usually spot the purple, squishy ones that are over-ripe and no good. The ideal color for your regular red raspberry is ruby to garnet color. You don't want fire-engine red with super hard little berries, you want the deep vibrant rich red. However you also do not want purple, squishy berries. As soon as they are harvested, I rinse them in a salad spinner and began to sort based on what I will be using them for.
 RSS Feed
