It is a couple of days after Thanksgiving and you are probably looking at a bunch of leftover turkey, vegetables, and gravy. I always end up with a lot of leftover turkey and gravy but the mashed potatoes, sweet potatoes, and pies are long gone.
I started turning those leftovers into easy future dinners with a little bit of planning ahead or a quick run to the grocery store. Once you have the Turkey Pot Pies all packed up, they are easy to store in your freezer for a quick dinner 2 months from now. The key here is to buy pre-cooked frozen veggies, easy roll out dough, and a packet of instant gravy on hand (just in case).
I started turning those leftovers into easy future dinners with a little bit of planning ahead or a quick run to the grocery store. Once you have the Turkey Pot Pies all packed up, they are easy to store in your freezer for a quick dinner 2 months from now. The key here is to buy pre-cooked frozen veggies, easy roll out dough, and a packet of instant gravy on hand (just in case).
| Ingredients: A lot of this is up to you but here are my recommendations to make 6 pot pies. - 3 containers of Crescent rolls or better yet the new dough sheets. Optional: 1 additional roll for sides - 6 cups of mixed vegetables (I buy small bags of peas/corn/carrots, frozen potatoes, and chopped onions or you can use leftover peas/corn, Brussel sprouts, green beans, or any combination you would like) - 5 cups of gravy (I am always a bit short so I mix my real gravy with a good instant or jarred gravy) Tip: the vegetables will "water down" your gravy, so leave it a bit thicker than usual. - 3 cups of chopped up left over turkey - 6 disposable pot pie tins (look in the disposable cooking pans aisle) or large ramekins if you have them - 6 Quart size freezer bags - Heavy duty Aluminum foil to wrap the top of the pot pies before freezing |  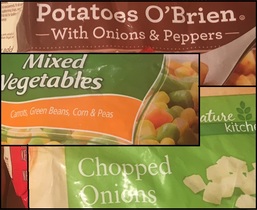 |
Directions:
1) In a large mixing bowl, mix all the frozen or leftover vegetables
2) Unroll the Crescent dough (I prefer this dough over pie crust for the buttery flavor and thinness of sheets) onto a cutting board, wax paper, or parchment paper
3a) Use the pot pie tin to cut out two circles of dough for each pot pie. One dough circle using the bottom of the tin and one using the top of the tin. Tip: Use a pizza cutter as your cutter rather than a knife.
3b) Repeat Steps 2 and 3a until you have 6 sets of dough circles (large and small).
4) Put the smaller circle of dough in the bottom of each tin. Optional: You can run a strip of dough along the edge as well but you will need 1 more roll of dough to cut strips and run along edges
5) Once bottom and optional sides are in each tin, sprinkle 1/4 Cup of turkey pieces into bottom of each tin
6) Add 1 cup of vegetables to each tin
7) Add 1/4 of turkey to top of pot pie tin
8) Pour 1/2 to 3/4 cup of gravy onto the top of each pot pie. Make sure you gently pick them up and "drop" the pot pie onto the counter a couple of times to get the air bubbles out and let the gravy settle.
9) Cover each pot pie with the larger dough circle. Press the edges around the pie to seal it in.
10) Cut small holes in the middle of the dough topper to let the steam escape when you do cook them.
For Freezing:
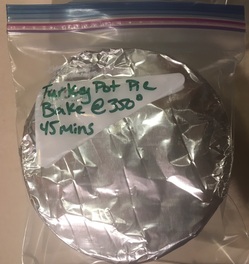
Carefully wrap each pot pie in tin foil and then slide into a labeled quart size freezer bag. I have kept them as long as 6 months with no problem of freezer burn.
When Ready to Cook:
- When you are ready to cook them, remove from the plastic bag and tin foil, then place the pot pies on large cookie sheet.
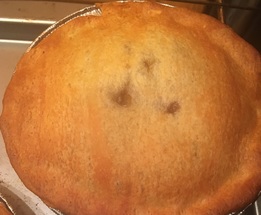
- Cook in a preheated 350 degree oven for 45 mins to 1 hour. If the crust starts to get too brown, cover with tin foil while cooking. The filling is already all cooked; you are just cooking the dough. By only putting dough on the bottom and the top, you are essentially defrosting and cooking at the same time.
Tip: Stick a knife in the middle and then pull out the knife to see if the gravy and vegetables are heated all way through.
Carefully wrap each pot pie in tin foil and then slide into a labeled quart size freezer bag. I have kept them as long as 6 months with no problem of freezer burn.
When Ready to Cook:
- When you are ready to cook them, remove from the plastic bag and tin foil, then place the pot pies on large cookie sheet.
- Cook in a preheated 350 degree oven for 45 mins to 1 hour. If the crust starts to get too brown, cover with tin foil while cooking. The filling is already all cooked; you are just cooking the dough. By only putting dough on the bottom and the top, you are essentially defrosting and cooking at the same time.
Tip: Stick a knife in the middle and then pull out the knife to see if the gravy and vegetables are heated all way through.
 RSS Feed
