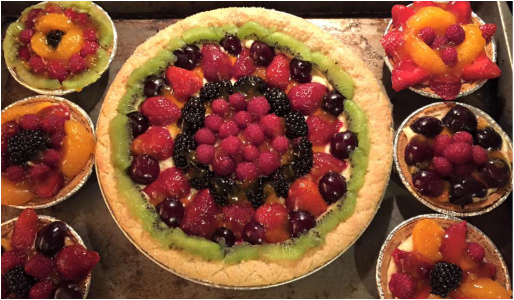
With all the lovely fruit that is available during the brief summer months, fruit tarts are one of my favorite treats! Now, to be totally honest, I am not a baker. I love cooking but baking is more technical - you have to measure and be precise and stuff. This is not how I cook. I make things that taste great by adding a bit of this, a bit of that, and magically it all shows up. So with this in mind, I make simple fruit tarts but trust me - they are fabulous and no one will know how simple they are if you don't tell them. :)
Things you will need:
- Fruit of your choice- washed and dried (I use my fresh grown raspberries, blackberries, and strawberries and then supplement with store bought things like mandarin oranges and kiwis or fresh produce from the farmer's market like the cherries, nectarines, and peaches)
- one box of instant, no cook, vanilla pudding mix
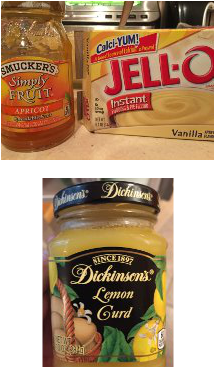
- 1 small jar of apricot spreadable fruit/preserves
- 1 small can of sweetened condensed milk
- 1 Tablespoon lemon juice
- 2 Tablespoons orange liquor
- 1 pint of heavy whipping cream (can use whole milk but not as good)
- 2 cups Vanilla/French vanilla yogurt- not Greek yogurt though
- 1 small jar of lemon curd (in the jam aisle, right near apricot preserves. Some stores may have it with the "British food" section. This is one of the things that I think makes my pastry crème amazing, so I would spend some time finding it or you can make it ahead of time and then use left
overs on scones/muffins. Do not substitute with "lemon pie filling")
- granulated sugar, not the super fine stuff! Rock sugar, if you can find it
- pre-made pie crusts - not deep dish
- Fruit of your choice- washed and dried (I use my fresh grown raspberries, blackberries, and strawberries and then supplement with store bought things like mandarin oranges and kiwis or fresh produce from the farmer's market like the cherries, nectarines, and peaches)
- one box of instant, no cook, vanilla pudding mix
- 1 small jar of apricot spreadable fruit/preserves
- 1 small can of sweetened condensed milk
- 1 Tablespoon lemon juice
- 2 Tablespoons orange liquor
- 1 pint of heavy whipping cream (can use whole milk but not as good)
- 2 cups Vanilla/French vanilla yogurt- not Greek yogurt though
- 1 small jar of lemon curd (in the jam aisle, right near apricot preserves. Some stores may have it with the "British food" section. This is one of the things that I think makes my pastry crème amazing, so I would spend some time finding it or you can make it ahead of time and then use left
overs on scones/muffins. Do not substitute with "lemon pie filling")
- granulated sugar, not the super fine stuff! Rock sugar, if you can find it
- pre-made pie crusts - not deep dish

Pie Crust:
1) Easy trick to make your pie crust better: After the crust defrosts and while you are waiting for the oven to heat up, coat the crust with the rock sugar. [Alternative to make tartlets: Take the second crust in the set and spread out and cut into little pie shapes and put in muffin tins with sugar on them.]
1) Poke holes in bottom of crust and cook in 400 degree oven for 18 minutes or so.
2) Put on counter to cool
Apricot Glaze:
1) Add 1 cup of the apricot preserves/spreadable fruit into a large, microwave safe glass.
2) Add lemon juice and orange liquor to the preserves and mix until well blended.
3) Heat in microwave for 2 minutes (cooks off alcohol).
4) carefully remove glass and mix well. Let cool a bit on counter.
How to Make the Pastry Crème:
This is my cheater recipe. I have had given/shared it with pastry chefs and they have been "wowed" by it. Seriously.
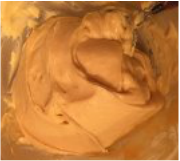
1) Empty contents of the pudding mix into a large mixing bowl.
2) In a 3 Cup measuring glass measuring glass, add 1 and 3/4 Cups of the vanilla yogurt, 1/3 Cup of the lemon curd, 2 Tablespoons of the sweetened condensed milk. Fill with the heavy whipping until you hit the 3 Cup mark.
3) Mix all the ingredients well in the measuring glass until they are smooth.
4) Pour the mixture into the bowl with the pudding powder mix and whisk until smooth.
5) Put in fridge to thicken and stay cold until ready to fill tarts.
This is my cheater recipe. I have had given/shared it with pastry chefs and they have been "wowed" by it. Seriously.
1) Empty contents of the pudding mix into a large mixing bowl.
2) In a 3 Cup measuring glass measuring glass, add 1 and 3/4 Cups of the vanilla yogurt, 1/3 Cup of the lemon curd, 2 Tablespoons of the sweetened condensed milk. Fill with the heavy whipping until you hit the 3 Cup mark.
3) Mix all the ingredients well in the measuring glass until they are smooth.
4) Pour the mixture into the bowl with the pudding powder mix and whisk until smooth.
5) Put in fridge to thicken and stay cold until ready to fill tarts.
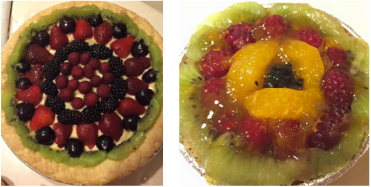 Left: Apricot Glaze under the fruit. Right: Apricot Glaze added on top of fruit.
 Tart Assembly:
Well, this is the easy part and you get to use your imagination.
1) Put a thin layer of the pastry crème into the crust. Some people like thicker layers, I subscribe to no more than 1/2 an inch of crème to balance with the fresh fruit and the apricot glaze.
2) depending on how sweet you fruit is, you have two choices for the glaze:
a) spread a thin layer over the crème for an added layer of sweetness in every bite. This leaves the fruit looking pristine, or
b) Add the glaze over the top of the fruit to make them shiny and add sweetness to the fruit. I prefer this method with less sweet fruit like kiwis, mandarins, etc.
3) Put the tarts in the fridge for a few hours to chill but they are ready to serve!
 RSS Feed
